
Introduction to Hand Wrapping for Boxing
Hand wrapping is a fundamental skill in the world of boxing. It is a protective measure that every boxer, whether beginner or professional, must master. This article aims to provide a comprehensive guide on how to wrap your hands properly for boxing, the importance of doing so, and the common injuries that can occur from improper hand wrapping.
- Importance of Proper Hand Wrapping in Boxing
- Common Injuries from Improper Hand Wrapping
Hand wrapping is not just a tradition in boxing; it serves a crucial protective function. The hands are the primary tools in boxing, and they consist of numerous small bones that can easily break under the force of a punch. Hand wraps provide a protective layer that helps prevent such injuries.
Proper hand wrapping compresses the bones in the hand, providing additional support and reducing the risk of fractures. It also helps to prevent sprains and strains in the wrists, fingers, and thumbs. In addition, the padding from the wraps can help to protect your knuckles from cuts and bruises.
According to a study published in the American Journal of Sports Medicine, boxers who do not wrap their hands properly are 3 times more likely to suffer hand injuries. This statistic underscores the importance of mastering this skill.
Improper hand wrapping can lead to a variety of injuries. These can range from minor bruises and cuts to more serious conditions that may require medical attention.
One of the most common injuries is a ‘Boxer’s Fracture’, which is a break in the small bones of the hand that form the knuckles. This can occur when a punch is thrown without adequate support from the hand wraps.
Other common injuries include sprains and strains in the wrists and fingers, and ‘Boxer’s Knuckle’, a condition where the tendons over the knuckle become inflamed. Improper hand wrapping can also lead to cuts and abrasions on the knuckles due to insufficient padding.
Understanding the importance of proper hand wrapping and the potential injuries that can occur from improper technique is the first step in mastering this essential boxing skill. The following sections will provide detailed instructions and tips on how to wrap your hands properly for boxing.
Boxing Hand Wrapping Guide: Materials Needed
Before we delve into the step-by-step guide on how to wrap your hands for boxing, it’s essential to gather all the necessary materials. Having the right tools at your disposal will make the process smoother and ensure that your hands are well-protected. Here are the three main items you will need:
- Boxing Wraps: Boxing wraps are the primary material you will need. These are long strips of cloth that you wrap around your hands and wrists to provide support and protection. They come in different lengths, but for most people, wraps that are 180 inches long will do the job. Boxing wraps are usually made of cotton, polyester, or a blend of both. They are designed to be flexible and durable, allowing you to securely wrap your hands without restricting your movement.
- Scissors: A pair of scissors is another essential tool for hand wrapping. You might need to cut the adhesive tape or trim the boxing wraps to the right size. It’s best to use a pair of sharp scissors to ensure clean and precise cuts. Remember, safety first! Always be careful when handling scissors.
- Adhesive Tape: Adhesive tape is used to secure the boxing wraps in place. It helps to keep the wraps from unraveling during your boxing session. The tape should be strong enough to hold the wraps securely, but it should also be easy to remove without causing discomfort or leaving residue on your skin.
With these materials at hand, you’re ready to start wrapping your hands for boxing. In the next section, we will guide you through the process step by step.
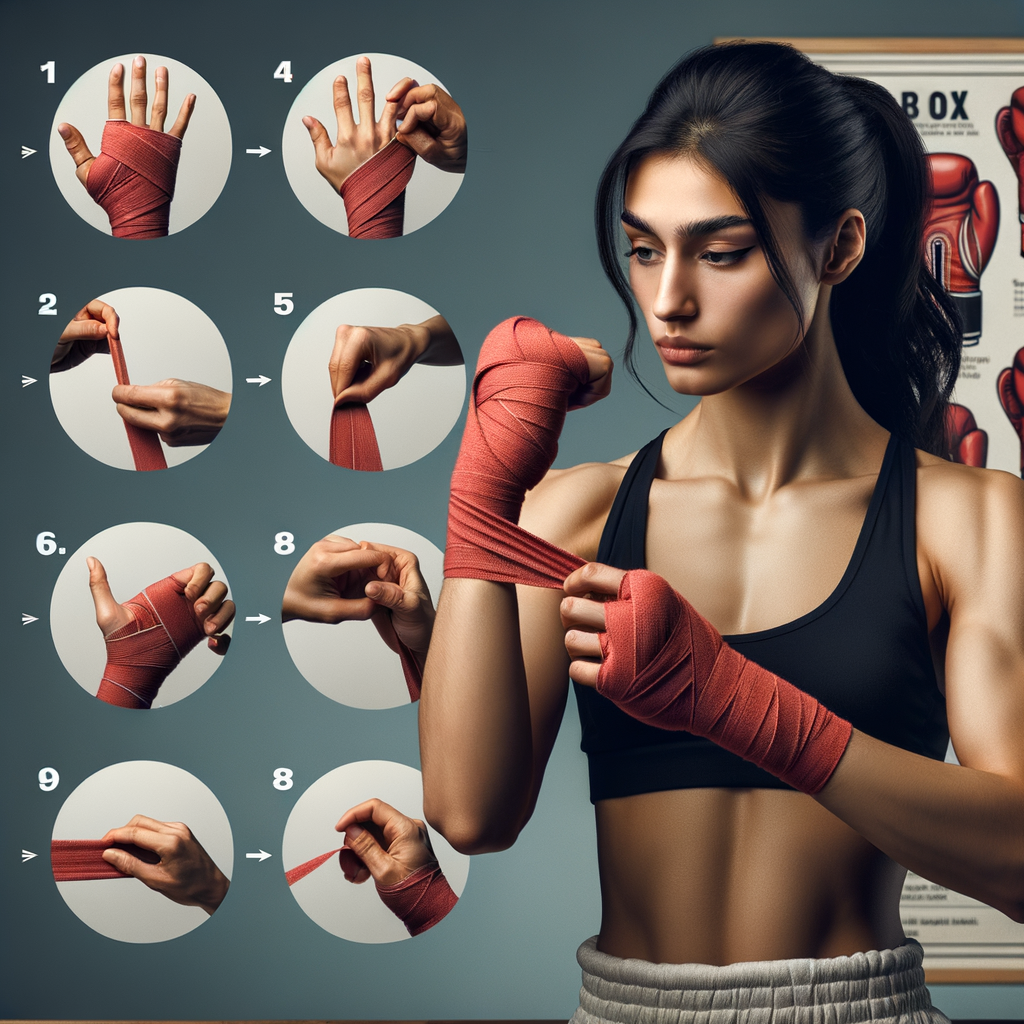
Step-by-Step Hand Wrapping Instructions
Step 1: Preparing the Hand
Before we start the actual process of wrapping your hands, it’s crucial to prepare your hands properly. This step is often overlooked, but it’s just as important as the wrapping itself. Let’s break it down into two main tasks: cleaning and drying your hand, and checking for injuries.
- Cleaning and Drying the Hand
- Checking for Injuries
Start by washing your hands thoroughly with soap and warm water. This will remove any dirt or oils that could interfere with the wrap’s grip. After washing, dry your hands completely. Any moisture left on your hands can cause the wrap to slip, reducing its effectiveness.
Next, carefully inspect your hands for any cuts, bruises, or swelling. If you find any, it’s best to seek medical advice before proceeding with the wrap. Wrapping over an injured hand can exacerbate the injury and prolong your recovery time.
Once your hands are clean, dry, and injury-free, you’re ready to move on to the next step: wrapping the wrist. But we’ll save that for another section. For now, remember that preparation is key. A well-prepared hand is the foundation of a successful hand wrap.
Step 2: Wrapping the Wrist
After preparing your hand, the next step is to wrap your wrist. This step is crucial as it provides the necessary support to your wrist, preventing injuries during your boxing sessions. Let’s delve into the proper technique for wrist support and the common mistakes you should avoid.
- Proper Technique for Wrist Support
- Common Mistakes to Avoid
- Wrapping too loosely: If the wrap is too loose, it won’t provide the necessary support and can easily unravel during your boxing session.
- Wrapping too tightly: On the other hand, if the wrap is too tight, it can restrict blood flow, leading to discomfort and potential injury.
- Not wrapping enough times: As mentioned earlier, aim for three to four wraps around the wrist. Too few wraps won’t provide enough support.
- Ignoring discomfort: If your wrist feels uncomfortable after wrapping, it’s a sign that something isn’t right. It could be too tight, too loose, or not wrapped correctly. Always listen to your body and adjust as necessary.
The key to effective wrist support is to ensure the wrap is tight enough to offer support, but not so tight that it restricts blood flow. Start by unrolling your hand wrap and locate the loop at the end. Slip this loop over your thumb and begin wrapping around your wrist. Aim for three to four wraps around the wrist, making sure each wrap is smooth and flat against your skin. Once you’ve wrapped your wrist, move on to the thumb and fingers.
When wrapping your wrist, there are a few common mistakes that can lead to ineffective support or even injuries. Here are a few to avoid:
Remember, practice makes perfect. Don’t be discouraged if you don’t get it right the first time. With time and practice, you’ll be able to wrap your wrist effectively and efficiently, ensuring maximum support and protection during your boxing sessions.
Step 3: Wrapping the Thumb
After securing the wrist, the next crucial step in hand wrapping for boxing is wrapping the thumb. This step is essential for two main reasons:
- Importance of Thumb Protection in Boxing
- Correct Method for Thumb Wrapping
Importance of Thumb Protection in Boxing
Protecting your thumb during boxing is just as important as protecting your knuckles or wrist. The thumb is a small but vital part of your hand that can easily get injured during a boxing match. In fact, thumb injuries account for approximately 10% of all boxing-related injuries.
Without proper protection, a boxer can suffer from ‘Boxer’s Thumb,’ a common injury where the thumb’s ligament is damaged. This can lead to severe pain and can significantly affect your boxing performance. Therefore, it is crucial to wrap your thumb correctly to prevent such injuries.
Correct Method for Thumb Wrapping
Now that we understand the importance of thumb protection, let’s learn the correct method for thumb wrapping. Here is a step-by-step guide:
- Start by holding the wrap flat against the palm of your hand, with the thumb loop over your thumb.
- Wrap the bandage around your wrist 3-4 times for support.
- From the wrist, bring the wrap up to the base of your thumb.
- Wrap around your thumb, moving from the base to the tip, ensuring it’s snug but not too tight.
- Once the thumb is fully wrapped, bring the wrap back down to your wrist to secure it.
Remember, the wrap should be comfortable and not too tight. You should be able to move your thumb freely without feeling any discomfort.
By following these steps, you can ensure your thumb is well protected and ready for any boxing match. Remember, safety should always be your top priority when participating in any sport, and boxing is no exception.
Step 4: Wrapping the Knuckles
After securing your thumb, the next step is to wrap your knuckles. This step is crucial as it provides the necessary protection to your knuckles, preventing injuries during boxing. Let’s dive into the techniques for maximum knuckle protection and how to ensure comfort and flexibility.
- Techniques for Maximum Knuckle Protection
- Ensuring Comfort and Flexibility
When wrapping your knuckles, it’s important to use a technique that offers maximum protection. Start by spreading your fingers wide apart. This creates spaces between your knuckles, allowing the wrap to fit in comfortably. Then, wrap the bandage around your knuckles three to four times, depending on the length of your wrap and the size of your hand. Make sure the wrap is tight enough to offer support, but not so tight that it cuts off circulation.
Comfort and flexibility are key when wrapping your knuckles. If your wrap is too tight, it can restrict your hand movements and cause discomfort. On the other hand, if it’s too loose, it won’t provide the necessary support. To ensure comfort and flexibility, wrap the bandage in a crisscross pattern over your knuckles. This allows for a greater range of motion while still providing ample support. Remember, the goal is to protect your hand without hindering your boxing performance.
In conclusion, wrapping your knuckles correctly is a vital part of hand wrapping for boxing. It not only protects your knuckles from injuries but also ensures you can move your hand freely. So, take your time to practice and perfect this step.
Step 5: Securing the Wrap
Now that we’ve covered the basics of wrapping your hand, wrist, thumb, and knuckles, it’s time to secure the wrap. This final step is crucial to ensure that your wrap stays in place during your boxing session. Let’s look at how to finish the wrap and check for a proper fit and comfort.
- Finishing the Wrap
- Checking for Proper Fit and Comfort
After you’ve wrapped your knuckles, thumb, and wrist, you should have a small amount of wrap left. This remaining wrap should be used to secure everything in place. Start by wrapping around your wrist a few more times. Then, use the remaining wrap to go over your knuckles and thumb again. This will provide an extra layer of protection and ensure that the wrap doesn’t come loose during your workout. Once you’ve used up all the wrap, secure the end with the Velcro strap or tuck it in if your wrap doesn’t have one. Congratulations, you’ve successfully wrapped your hand for boxing!
Once you’ve secured the wrap, it’s important to check for a proper fit and comfort. Your wrap should feel snug, but not too tight. If it’s too tight, it can cut off circulation and cause discomfort. On the other hand, if it’s too loose, it won’t provide the necessary support and protection. Try making a fist and opening your hand a few times. If you can do this comfortably, your wrap is likely a good fit. If not, you may need to adjust it. Remember, comfort is key when it comes to hand wraps. If it doesn’t feel right, don’t hesitate to unwrap and start again.
Securing the wrap correctly is just as important as the wrapping process itself. It ensures that your hand, wrist, thumb, and knuckles are well-protected and comfortable during your boxing session. So, take your time and make sure you get it right. Happy boxing!
Boxing Hand Wrapping Techniques: Variations and Alternatives
There are several ways to wrap your hands for boxing, each with its own unique benefits. Let’s explore some of the most popular methods.
-
Traditional Method
The traditional method of hand wrapping is a time-tested technique that provides solid protection for your hands. It involves wrapping the bandage around your wrist, then your knuckles, and finally your thumb. This method is known for its simplicity and effectiveness. It’s a great starting point for beginners.
-
Mexican Style
Also known as the “loop method,” the Mexican style of hand wrapping is favored by many professional boxers. This technique involves creating loops around your fingers, providing extra padding and support. It’s a bit more complex than the traditional method, but with practice, you can master it. This method is particularly beneficial for those who throw powerful punches and need extra protection.
-
Gauze and Tape Method
The gauze and tape method is often used in professional boxing matches. It involves wrapping your hands with gauze, then securing it with tape. This method provides excellent support and protection, but it’s more time-consuming and requires more materials. It’s best suited for serious training sessions or professional bouts.
Remember, the best hand wrapping technique for you depends on your personal preference and boxing style. Don’t be afraid to experiment with different methods until you find one that feels comfortable and provides the protection you need.
Key Takeaways
| Method | Benefits | Best For |
|---|---|---|
| Traditional | Simple, effective | Beginners |
| Mexican Style | Extra padding, support | Powerful punchers |
| Gauze and Tape | Excellent support, protection | Professional bouts |
Regardless of the method you choose, remember that the goal of hand wrapping is to protect your hands and wrists from injury. Practice makes perfect, so keep trying until you find the technique that works best for you.
Hand Wrapping for Boxers: Maintenance and Care
Just as important as learning how to wrap your hands for boxing, is knowing how to maintain and care for your boxing wraps. After all, your hand wraps are a crucial part of your boxing gear. They protect your hands and wrists from injuries, so it’s essential to keep them in good condition. Let’s look at two key areas: cleaning and storing your wraps, and knowing when to replace them.
- Cleaning and Storing Boxing Wraps
- Hand wash your wraps in warm soapy water. Avoid using bleach as it can damage the material.
- Rinse them thoroughly to remove all soap.
- Roll them up and press out any excess water. Don’t wring them as it can stretch the fabric.
- Lay them flat or hang them up to air dry. Avoid using a dryer as the heat can shrink the wraps.
- When to Replace Boxing Wraps
- The wraps have become too stretched out and don’t provide enough support.
- They have holes or tears in them.
- They have a persistent smell even after washing.
- You’ve been using the same pair of wraps for more than six months. Even if they still look okay, it’s a good idea to replace them every six months to ensure maximum protection.
Boxing wraps can get pretty sweaty and dirty after a good workout. To keep them clean and free from bacteria, it’s best to wash them after each use. Here’s a simple process you can follow:
When it comes to storing your wraps, keep them in a cool, dry place. Roll them up neatly to prevent them from getting tangled. Some boxers like to use a wrap roller, but this isn’t necessary. As long as your wraps are clean and dry, they should stay in good shape.
Even with proper care, boxing wraps don’t last forever. Over time, they can lose their elasticity and become less effective at protecting your hands. Here are some signs that it’s time to replace your wraps:
Remember, your hand wraps are an essential part of your boxing gear. By taking good care of them, you’re also taking care of your hands and wrists.
Conclusion: Mastering Hand Wrapping for Boxing
As we wrap up this comprehensive guide on hand wrapping for boxing, it’s crucial to remember that mastering this skill is a journey. It’s not about perfection, but about continuous improvement and understanding the importance of protecting your hands. Let’s summarize our key takeaways and emphasize the importance of regular practice.
- Key Takeaways
- Importance of Regular Practice
Hand wrapping is an essential part of boxing that protects your hands and wrists from injuries. The materials needed for hand wrapping include boxing wraps, optional adhesive tape, and a pair of scissors. The step-by-step guide provided in this article will help you master the basic hand wrapping technique. However, there are also variations and alternatives to this technique, which you can explore as you gain more experience. Lastly, maintaining and caring for your hand wraps is crucial to ensure their longevity and effectiveness.
Like any other skill, mastering hand wrapping requires regular practice. It might seem complicated at first, but with time and consistent practice, you’ll be able to wrap your hands quickly and efficiently. Remember, the more you practice, the better you get. So, make hand wrapping a part of your regular boxing routine. It’s not just about doing it right; it’s about making it a habit.
In conclusion, hand wrapping for boxing is a skill that every boxer, whether a beginner or a professional, should master. It’s not just about protecting your hands; it’s about enhancing your performance and ensuring a long and successful boxing career. So, keep practicing, stay patient, and you’ll master this essential skill in no time.


